游戏主场景
现在是时候将我们所做的一切整合到一个可玩的游戏场景中了。
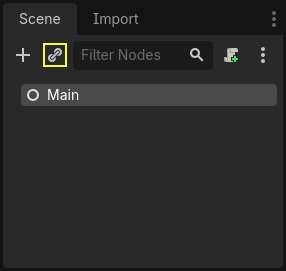
创建新场景并添加一个 Node 节点,命名为 Main。(我们之所以使用 Node 而不是 Node2D,是因为这个节点会作为处理游戏逻辑的容器使用。本身是不需要 2D 功能的。)
点击实例化按钮(由链条图标表示)并选择保存的 player.tscn。
现在,将下列节点添加为 Main 的子节点,并按如下所示对它们进行命名:
Timer(名为
MobTimer)——控制怪物产生的频率Timer(名为
ScoreTimer)——每秒增加分数Timer(名为
StartTimer)——在开始之前给出延迟Marker2D(名为
StartPosition)——表示玩家的起始位置
如下设置每个 Timer 节点的 Wait Time 属性(值以秒为单位):
MobTimer:0.5ScoreTimer:1StartTimer:2
此外,将 StartTimer 的 One Shot 属性设置为“启用”,并将 StartPosition 节点的 Position 设置为 (240, 450)。
生成怪物
主节点将生成新的怪物,我们希望它们出现在屏幕边缘的随机位置。点击场景面板中的 Main 节点,然后添加一个 Path2D 名为 MobPath 的子节点。当选中 Path2D 节点后,你会在编辑器顶部看到一些新按钮:

选中中间的按钮("添加点"),然后通过ctrl+点击屏幕四角添加路径点。若要使点自动吸附到网格上,请确保同时勾选"启用网格吸附"和"启用智能吸附"选项。这两个选项位于"锁定"按钮的左侧,分别显示为磁铁图标和带有交叉线的点阵图标。

重要
以顺时针的顺序绘制路径,否则小怪会向外而非向内生成!
在图像上放置点 4 后,点击 闭合曲线 按钮,你的曲线将完成。
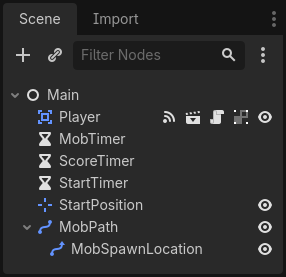
现在已经定义了路径,添加一个 PathFollow2D 节点作为 MobPath 的子节点,并将其命名为 MobSpawnLocation。 该节点在移动时,将自动旋转并沿着该路径,因此我们可以使用它沿路径来选择随机位置和方向。
你的场景应如下所示:
Main 脚本
将脚本添加到 Main。在脚本的顶部,我们使用 @export var mob_scene: PackedScene 来允许我们选择要实例化的 Mob 场景。
extends Node

@export var mob_scene: PackedScene
var score
using Godot;

public partial class Main : Node
{
    // Don't forget to rebuild the project so the editor knows about the new export variable.

    [Export]
    public PackedScene MobScene { get; set; }

    private int _score;
}
单击 Main 节点,就可以在“检查器”的“Script Variables”(脚本变量)下看到 Mob Scene 属性。
有两种方法来给这个属性赋值:
将
mob.tscn从“文件系统”面板拖放到 Mob Scene 属性里。单击“[空]”旁边的下拉箭头按钮,选择“加载”。选择
mob.tscn。
然后选中“场景”面板中 Main 节点下的 Player 场景实例,切换到侧边栏的“节点”面板。请确保“节点”面板中的“信号”选项卡处于选中状态。
你可以看到 Player 的信号列表。找到 hit 信号并双击(或右键选择 "Connect...")将会打开信号连接窗口。接下来创建用于在游戏结束时进行一些处理的 game_over 函数。在信号连接窗口底部的 “Receiver Method” 框中输入 “game_over”,并点击 “Connect”。 你的目标是从 Player 发出 hit 信号,并在 Main 脚本中进行处理。将以下代码添加到新函数中,以及一个 new_game 函数,该函数将为新游戏设置一切:
func game_over():
    $ScoreTimer.stop()
    $MobTimer.stop()

func new_game():
    score = 0
    $Player.start($StartPosition.position)
    $StartTimer.start()
public void GameOver()
{
    GetNode<Timer>("MobTimer").Stop();
    GetNode<Timer>("ScoreTimer").Stop();
}

public void NewGame()
{
    _score = 0;

    var player = GetNode<Player>("Player");
    var startPosition = GetNode<Marker2D>("StartPosition");
    player.Start(startPosition.Position);

    GetNode<Timer>("StartTimer").Start();
}
现在将每个 Timer 节点(StartTimer、ScoreTimer 和 MobTimer)的 timeout() 信号连接到主脚本。对于这三个计时器,依次执行以下操作:在场景停靠栏选中计时器 → 打开节点停靠栏的信号标签页 → 双击列表中的 timeout() 信号 → 在弹出的信号连接对话框中点击 Connect (保持默认设置即可)。
完成这三个计时器的设置后,你可以在它们各自的“信号”选项卡中看到每个计时器的 timeout() 信号都已成功连接,并以绿色高亮显示。
(对于 MobTimer):
_on_mob_timer_timeout()(对于 ScoreTimer):
_on_score_timer_timeout()(对于 StartTimer):
_on_start_timer_timeout()
现在我们通过添加下面的代码来定义这些计时器的操作方式。注意到StartTimer将启动其他两个计时器,然后ScoreTimer 将使得分加 1。
func _on_score_timer_timeout():
    score += 1

func _on_start_timer_timeout():
    $MobTimer.start()
    $ScoreTimer.start()
// We also specified this function name in PascalCase in the editor's connection window.
private void OnScoreTimerTimeout()
{
    _score++;
}

// We also specified this function name in PascalCase in the editor's connection window.
private void OnStartTimerTimeout()
{
    GetNode<Timer>("MobTimer").Start();
    GetNode<Timer>("ScoreTimer").Start();
}
在 _on_mob_timer_timeout() 中, 我们先创建小怪实例,然后沿着 Path2D 路径随机选取起始位置,最后让小怪移动。PathFollow2D 节点将沿路径移动,并会自动旋转,所以我们将使用它来选择怪物的方位和朝向。生成小怪后,我们会在 150.0 和 250.0 之间选取随机值,表示每只小怪的移动速度(如果它们都以相同的速度移动,那么就太无聊了)。
注意,必须使用 add_child() 将新实例添加到场景中。
func _on_mob_timer_timeout():
    # Create a new instance of the Mob scene.
    var mob = mob_scene.instantiate()

    # Choose a random location on Path2D.
    var mob_spawn_location = $MobPath/MobSpawnLocation
    mob_spawn_location.progress_ratio = randf()

    # Set the mob's position to the random location.
    mob.position = mob_spawn_location.position

    # Set the mob's direction perpendicular to the path direction.
    var direction = mob_spawn_location.rotation + PI / 2

    # Add some randomness to the direction.
    direction += randf_range(-PI / 4, PI / 4)
    mob.rotation = direction

    # Choose the velocity for the mob.
    var velocity = Vector2(randf_range(150.0, 250.0), 0.0)
    mob.linear_velocity = velocity.rotated(direction)

    # Spawn the mob by adding it to the Main scene.
    add_child(mob)
// We also specified this function name in PascalCase in the editor's connection window.
private void OnMobTimerTimeout()
{
    // Create a new instance of the Mob scene.
    Mob mob = MobScene.Instantiate<Mob>();

    // Choose a random location on Path2D.
    var mobSpawnLocation = GetNode<PathFollow2D>("MobPath/MobSpawnLocation");
    mobSpawnLocation.ProgressRatio = GD.Randf();

    // Set the mob's direction perpendicular to the path direction.
    float direction = mobSpawnLocation.Rotation + Mathf.Pi / 2;

    // Set the mob's position to a random location.
    mob.Position = mobSpawnLocation.Position;

    // Add some randomness to the direction.
    direction += (float)GD.RandRange(-Mathf.Pi / 4, Mathf.Pi / 4);
    mob.Rotation = direction;

    // Choose the velocity.
    var velocity = new Vector2((float)GD.RandRange(150.0, 250.0), 0);
    mob.LinearVelocity = velocity.Rotated(direction);

    // Spawn the mob by adding it to the Main scene.
    AddChild(mob);
}
重要
为什么要用 PI?在需要传入角度的函数中,Godot 使用的是弧度而不是度数。圆周率(Pi)表示转半圈的弧度,约为 3.1415(还提供了等于 2 * PI 的 TAU)。如果你更喜欢使用度数,则需使用 deg_to_rad() 和 rad_to_deg() 函数在这两种单位之间进行转换。
测试场景
让我们测试这个场景,确保一切正常。请将对 new_game 的调用添加至 _ready():
func _ready():
    new_game()
public override void _Ready()
{
    NewGame();
}
让我们同时指定 Main 作为我们的“主场景”——游戏启动时自动运行的场景。按下“运行”按钮,当弹出提示时选择 main.tscn。
小技巧
如果你已经将别的场景设置为“主场景”了,你可以在“文件系统”面板上右键点击 main.tscn 并选择“设为主场景”。
你应该可以四处移动游戏角色,观察敌人的生成,以及玩家被敌人击中时会消失。
当你确定一切正常时,在 _ready() 中删除对 new_game() 的调用,使用 pass 替代它。
我们的游戏还缺点啥?缺用户界面。在下一课中,我们将会添加标题界面并且显示玩家的分数。